
Hi!
A friend mentioned to me that she couldn't find any fun sewing projects that boys might like.
So, here's Lionel, he's a lizard. I'm going to show you how I made him today, so that you can make a brother or sister for him. Lizards are not just for boys, but I know more than a few boys who like lizards.

You will need:

- About 30cm by 20cm of felt for the body, any colour you like.
- A scrap of felt for a tongue, any colour you like.
- A strip of felt 30cm by 3cm, any colour you like, I like my spotty one.
- Some thread to match your body felt.
- Black thread.
- Two buttons.
- A needle.
- Some pins.
- Scissors
- Oh, and a pencil.
Step 1.
Making the body shape.

Fold your felt in half like this and place your hand on it like I have. Three fingers together in the middle, thumb and little finger sticking out a bit.

Draw a line around your hand while it's in this position. I drew around my left hand as I'm right handed. Leave a gap like I have as you draw around it, you need to do this so that your hand can fit inside. See how I didn't follow the line of my wrist? I just drew straight down from the widest part of my hand. It'll be no problem putting Lionel on with that nice big opening.
Put some pins in and cut out the two body pieces together.


Here it is all cut out. It looks like a cactus at the moment, and it's spiky with pins too, ouch!
Step 2.
Adding the spotty spikes.

Take out the pins and put one piece of the body out of the way. Cut the other body piece in half, don't worry if it goes a bit wobbly, it doesn't matter. This will be the top half of the body.

Draw a spiky line along the length of your felt strip. Make the spikes smaller towards one end, this is his tail.

Lay the spikes on top of one of the halves of the body so that the spikes stick over the edge like in the picture above. I put the spiky strip so that I could just see the body felt peeping up through the valleys of the spikes, then pushed it up a tiny bit.
If you want the lizard to fit your right hand, lay the thumb half down facing the same way as in my picture above. If you want it to fit your left hand, lay the little finger half down instead.
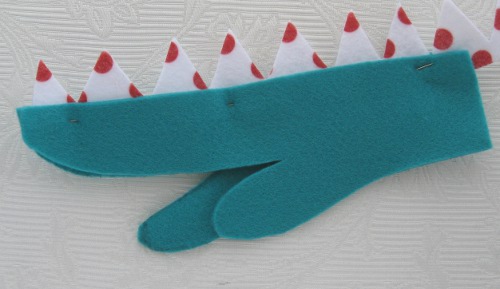
Put the other half on top which ever it is and sandwich the spikes in between. Pin through all three layers to hold them in place.

Using doubled thread, the colour that matches the body colour, sew with running stitch through all three layers from the tail to the nose. I'm just using this orange thread so that you can see what I'm doing. You can hide the knot by starting from the inside and going up through just one layer.


When you get to the nose, tie your knot on the underside like in the picture above. Take the pins out.

Trim the bit left over from the inside of your lizard, it might get in the way later.
Step 3.
Eyes and tongue.

Sew on the buttons where you'd like the eyes to be.

Using the black thread, sew through just two of the button holes to make his pupils. You can go through any two holes, maybe use different holes for each eye, that might make your lizard look extra funny.

Draw this shape on to the tongue felt. It looks a bit like South Africa's flag, turned around. Cut inside the pencil lines, chopping the marks off.

Take the other half of the body that you set aside and put it flat on the table. This will be the bottom half of the body.
Place the top body on the bottom body just to make sure that you have the bottom half the right way up. The two pieces should line up almost exactly. The tongue needs to be sewn on to the top of the bottom body so it will be in between the two when you are finished. Sew the tongue on with one stitch just to hold it in place for now.
Place the top body on the bottom body just to make sure that you have the bottom half the right way up. The two pieces should line up almost exactly. The tongue needs to be sewn on to the top of the bottom body so it will be in between the two when you are finished. Sew the tongue on with one stitch just to hold it in place for now.

I made the stitch pretty small so you can't really see it. It doesn't matter too much but it's good to practise this kind of thing, in case you want to hide stitches in the future.
Step 4.
Sewing up the body.

Put the bottom body piece on the table this way up with the whole tongue showing. Place upper body piece on top of it. The tongue end should be hidden in between.
Line up one side of the body pieces from the tongue to the bottom corner and pin together. The other side won't line up as the top body is slightly smaller than the bottom body.

Sew up with over stitch from the bottom corner to the tongue. You might run out of thread on the way up. Don't panic! When you think you are running out, just tie a small knot, cut the thread as close as you can to the knot and get more thread.

When you get to the tongue, sew through it and tie a knot underneath.

Take out your pins and line up the other side of the body, your lizard might curl up a bit as you line the edges up, that's to be expected. Stitch from the tongue down the other side you have just pinned, all the way to the bottom corner again.
Stop there! Don't sew up the hand hole. If you got over excited and sewed up the hand hole, just unpick your stitches back to the corner.

And you're done! Try your lizard on! Which hand does he fit?
What's your lizard's name?
Add your lizard to the Flickr group here: http://www.flickr.com/groups/sewingtuesday/
I love this guy! My favourite so far :)
ReplyDeleteThis looks like fun to make with my grandsons. Thank you.
ReplyDelete:o))
ReplyDelete